Sunday, March 11, 2012

Pole Arm Haft Repair

First major project of the year... I have to repair a pole arm haft that is in need of repair.  The top got mangled but the rest of the haft is still good wood so I'm going to attempt to save as much of the original piece of wood as possible.  I'm planning on splicing a new wood blank onto the top of the old haft and remounting the halberd head and banding.

I'll be documenting the progression of the fix so I can reproduce it if I need to.

First I made two cuts in the haft just below where the banding ended about 1/3 of the way through.  I will be removing wood from the original haft to make a post to affix the splice to.
 

Next I cut off the un-needed and damaged part of the haft.  I will start shaping the splice from the remaining material.

This is a closer look at the remaining material that I will shape the splice from.

I cut two shoulders for the splice using the two original cuts I made.

Continued to shape the splice.


The finished splice on the original haft of wood all cleaned up.  Total length of the splice is roughly 8 inches long.


I cut two new pieces of wood to form the other part of the splice from 1"x2" oak.  The new part of the splice will add a new two feet onto the original haft to help repair the damaged part.  In the new pieces I routed out  the negative profile of the splice so that when glued together they will form a cavity to slide over the haft.

Test fitting the splice.

Everything all glued up.  I'll wait 24 hours to make sure everything is nice and dry before I remove the clamps and start shaping the wood to blend the splice into the haft's original lines.


Next Steps:
  • Shape haft to match original shape
  • Chanel and fit the halberd head onto the haft
  • mount halberd head onto haft and finish wood and metal accordingly

Monday, July 25, 2011

Warning: Construction Site!

So the construction of our period oven has finally begun! We are three weekends into the season, and have gotten a lot done so far. Let's back up a bit...

Over our rehearsal weekends, the great guys and gals of GSM built a terrific stand for the oven in the kitchen. It measures 36 x 38 and is placed into the ground about 8-9 inches deep. We filled the the top of the stand with good ol' dirt and then laid brick on top, all of which will work as a heat and fire wall. We will hopefully be getting new (and even) bricks for the top, but here are a few shots of the stand:


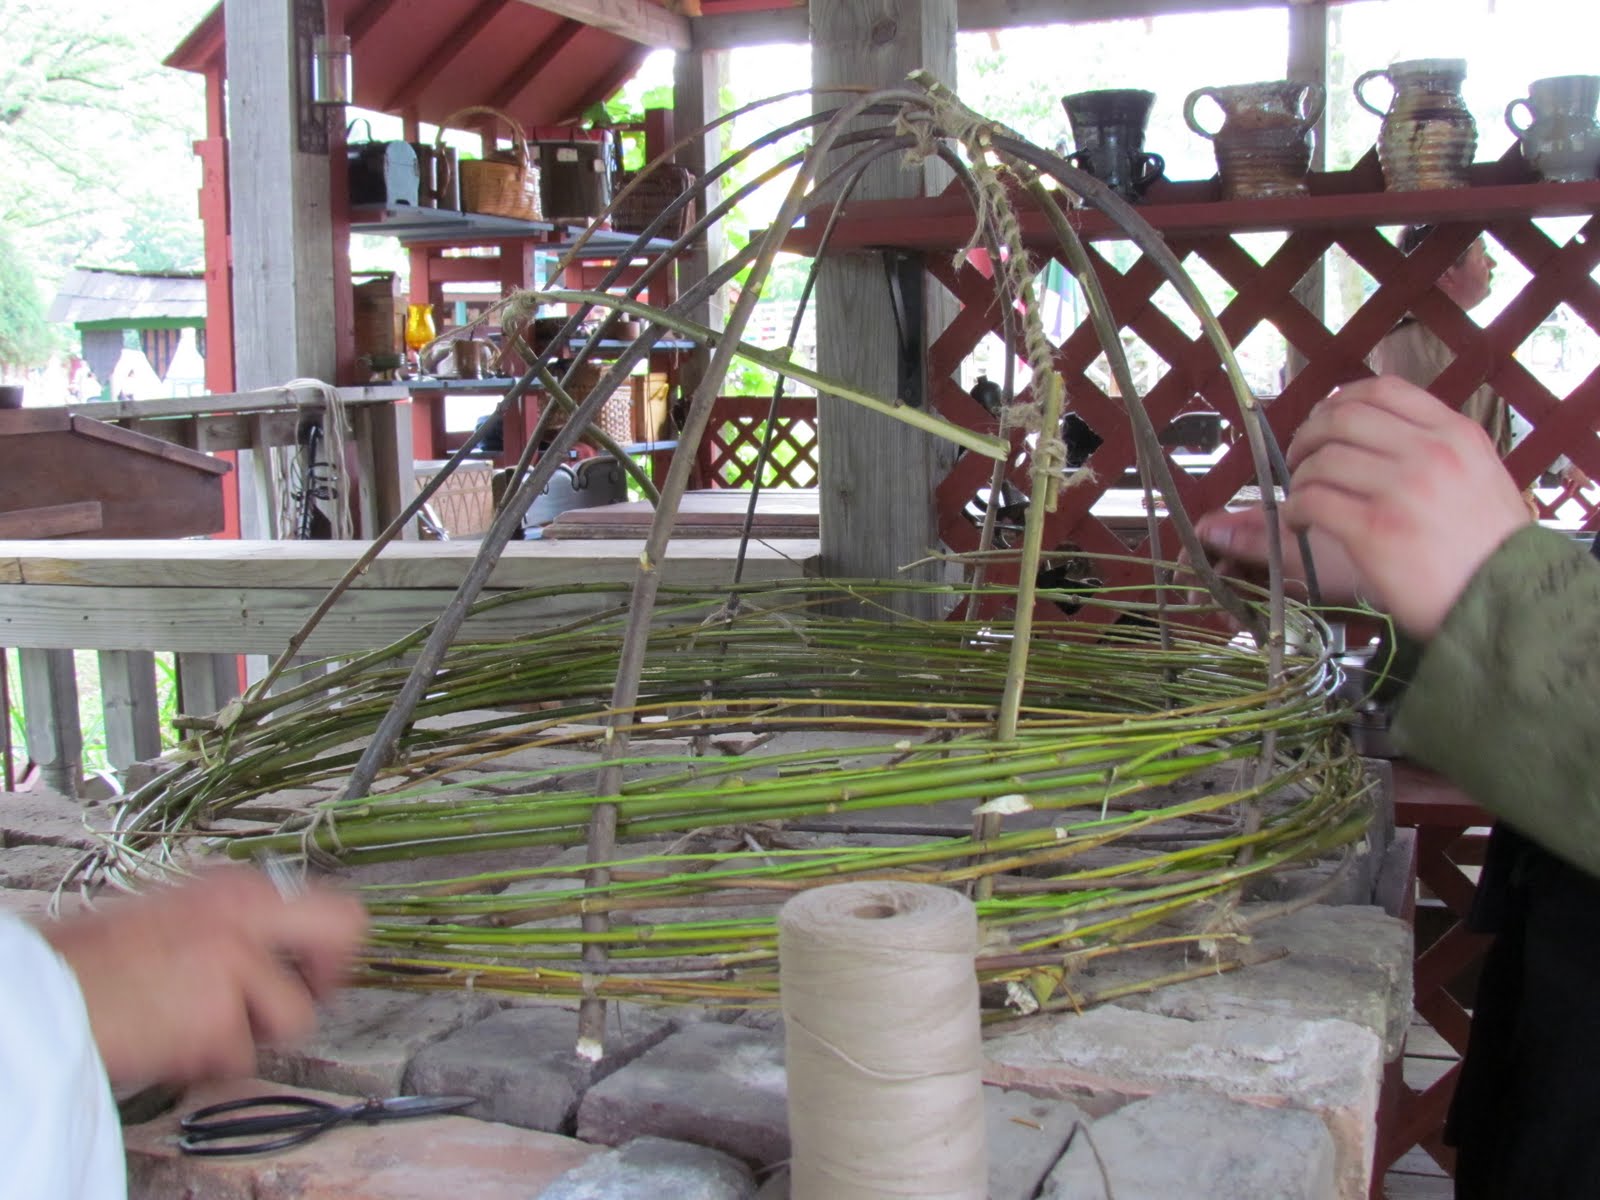
The next step was to start on the actual wooden frame of the oven. In many of the resources that I am using, they suggest using a wood frame first so that the the clay has something to grip on to and you can avoid cave-ins. When you fire the oven for the first time, the wood frame will burn out of the inside, leaving the clay structure behind. An excellent suggestion was made that we should use willow branches for this structure because they are very flexible and will not leave much of a residue behind when it burns out. We started with a simple cross frame and added cross supports on the bottom to keep the round shape. I found that eye-balling the size of the oven is not as easy as it looks: some actual math is involved to make sure everything is the right size and you leave space for clay to be added on in the future. Once the cross pieces were in place, it was time to weave! We wove the branches much like you would if you were making a basket, starting at the bottom and working our way to the top, all the while alternating thickness of branches and which way the branch was woven. Here are a few pictures:


We have a little bit more to do at the top, and then the frame is done! The next step is putting the clay on, and there is some debate over what we should use. We have some great artisan clay to work with, or we were thinking or trying to mix our own using mud, sand, and a little bit of concrete. More to come!

Thursday, April 14, 2011

Back to the workbench

I have a couple of pieces I'm hoping to move fairly quickly. I have some bills to pay and I want to pick up a couple of things before this year's season hits full swing. So I cut out and did the base profiles on a few knives that I'm going to be offer up for sale shortly.


They are ready for heat treat, which I hope to do this weekend. After that, they'll be scaled up and have leather sheaths made for them. I was given a couple pieces of ebony and holly from Mark of OlliN swords to play with so I'm thinking that two of them will have those as grips. The other two are up in the air. I'm also being tempted to do a wood sheath for the Mary Rose knife (one with the lobed handle and short blade at the top). There were a couple of fish shaped sheaths found on the wreck, and it would be a nice addition to a piece already based off of that find.

Tuesday, April 5, 2011

A nice Tudor beverage please

Some friends and I have taken to brewing beer. I gotta say, I'm hooked. I enjoy beer, and not in a "Whooo! Let's get ripped off of a couple cases of Milwaukee's Best Ice" way, but in a "I really like these flavors" way. Beer is good food, and really life is too short to not experience as much of it as possible. It really only seems natural given my love of history that I would try to combine history and beer.

Luckily for me there are plenty of folks doing just that. From wonderful programs like Kevin Cullen's Ale and Archeology sessions at Discovery World Museum to full production run brews by places like Dogfish Head Brewing, history is alive and well in the modern beer scene. Also luckily for me, the internet is filled with research and documentation on history and gastronomical culture. My two brewing partners, Scott and Rick, are also members of the Trayn'd Bande group I'm a part of and have an interest in this line of though too. All avenues began pointing to producing some historic ales.

The one we chose for our first group brewing session was our of William Harrison's Description of England. This is a 1577 recipe (based on the publication of the book) and covers a household ale brewed by Harrison's wife. Now the recipe itself makes enough beer for a household, as in a crap ton. We needed to scale it down to fit into our modern equipment levels of 5 gallon (US) batches. So using math from the help of Bob Davis's site on some historic brewing, we adjusted the grain and additive levels to the following:

11 lbs of Marris Otter Malt
1 lb of Wheat
1 lb of Oats
1 1/2 oz Cascade Hops
Pinch of Orris Root
Couple of Bay Laurel Berries
1 tsp Wheat Flour
Wyeast London Ale Yeast


Following the recipe recommendations we boiled off 3 gallon batches of water and added it to the mixture of grains. This was to steep while we set another three gallons to boil. The steep time varied a bit from cycle to cycle but ended up being about 50-60 minutes per steep. The first running didn't give us a whole lot of liquid. We really weren't expecting that though. Having all that grain, you expect a bunch of water to get sucked up.


The subsequent steeps and runnings gathered substantially more liquid as the grain was already saturated. The wort we ended up with had a nice cloudy golden color and smelled wonderful. We did a total of three runnings to get the 6 gallons we needed for the boil.


Once we had our 6 gallons we did a fourth run to gather any left over sugars the grains may have been hanging on to. The goal for this was to create a small ale. Small ales are low alcohol versions of regular ales that were consumed by all levels of society as a common drink during the 16th century. Our aim for this was to create a VERY low alcohol version that we could use at events. Here's a look at the super pale color the small ale had before boil.

We proceeded to do our hour long boils with both beers adding our additives as needed. We did use a bit of Irish moss to clarify the full version of the 1577 in the last 15 minutes of the boil. We then got the batches into the fermenters and pitched the yeast.

Sunday, March 13, 2011

Saber Hanger


A couple of folks I know are working with a group focusing on early 17th century central/Eastern European portrayals. They passed word and introduced me to a couple of their fellows who were interested in getting some hangers/pieces made. One project that I took on was for a saber hanger. Instead of the sliding buckles I'm used to on the belt (which allow the wearer to adjust as they feel comfortable), the saber's downward straps are fixed. Luckily the customer who wanted the piece was extremely good with communication and a pleasure to work with. He provided all the measurements needed, and I was able to put something together.

Instead of a pad hook like the 16th C hangers I'm used to, the two downward straps are attached to the belt through loops. I decided to create a piece based on a period example I purchased from Talbot's Fine Accessories. What I ended up with is this:


It works really well, and is fixed in place solidly.


Here's the whole thing:


For some reason the picture isn't working well, but in normal gravity things look and hang very nicely. This one is out the door and I'm looking forward to some cool new projects!

Sunday, January 16, 2011

Olive knife, or don't get cocky with wood

I've done a few knives now, I think more than a dozen. I've worked with paduak, walnut, oak, ash, and a few others. When my friend Mark showed me a piece of olive wood in a bargain bin at the local Woodcrafter I went for it. I then proceeded to become that wood's b!@#$.

Olive has beautiful grain, a lovely warm color, amazing feel when polished up and amazing smell. It is gorgeous. It works by hand pretty well, and I now know why all the sources I have since found for it are in the turning sections of wood stores and online catalogs. That beautiful grain makes cutting the stuff into scales for a scale tang knife interesting. I had a customer who wanted a knife with an Italian feel. My wife suggested I use the Olive, and I thought perfect! This is what happened four times, including after I had it scaled and polished up ready to go out for a deadline.


As you can see the wood cracked. A lot. It split on the grain very easily. After much swearing, running out to buy another block of wood, and throwing one of the broken scales violently in my garage (its the one NOT pictured), I got it to work. By cutting the scales thicker than I normally would and trimming down after they had been mounted I was able to get a clean and stable piece on the knife. After sanding and polishing this stuff looks gorgeous. Mark was right, it cleans up brilliantly. The grain stands out and it is warm and soft to the touch.

Here's the final product:

With flash-


and without -


Sheath is black veg tan and is going out the door tomorrow, in time for the customer's needs.

Tuesday, January 11, 2011

It's Been a While

It's been quite some time, but I haven't fallen off the face of the earth. School and work do a number on free time unfortunately, but I'm itching to get another couple projects off the ground. I figured in lieu of some grandiose research thing, I'd break down what I've been up to lately.

I'm well on my way to producing several pairs of cut cloth stockings/hose in wool; one pair blue, one yellow, and one gray (which will be overdyed with dark green or black to produce a "poor black"). A brief overview of their use was detailed in one of my previous posts. The goal is to fully phase out the knit stockings I have, as the kind that I had been wearing, though wool, aren't quite correct for the late 16th century. Some kinds of knit wool stockings were probably worn, but they were dissimilar to what's available at a reasonable price (let alone on a college student's budget!) I wore the cotton stockings that are favored by the reenactment community for several years before I saw the light and shifted to wool. Now I'm at the next step. We all have to start somewhere and the trick is to continue learning, improving, and moving on rather than just sit at "good enough" or fall into the thinking of the "ten foot rule" or worse when working with the public.

Also on the list is making a new doublet, but I can't quite decide what to make. It'll definitely be "early period" for Elizabethan (1560's-mid-1570's), but the material is the big choice now. I can do a dark brown worsted wool, a white linen canvas, or an unbleached linen canvas. I love the undeyed white wool one I wear now, but it's approaching the end of its days... I work with armor a lot and I'm afraid of destroying a nice white linen doublet with rust and grease right away. We'll see.

Last month I began building a six board chest (with a lot of help) in the style of the late 16th-early 17th century. My woodworking skills are...bad...to put it lightly, so things will go slow and sloppily for some time, but I'm very excited to finally have an awesome box to lug around all my junk in. It should be done by the summer.

I've also been commissioned to sew a 16th century Italian suit for a good friend of mine. I'm thinking a black worsted wool doublet guarded and trimmed with black velvet to achieve the textural contrast often seen in portraiture, with slashed/pinked black wool breeches. I'd like to line the doublet with some good Italian fustian, face the collar and possibly other smaller areas with some white silk satin I've got, and use hand-worked black linen thread buttons. I think that if it turns out the way I'm picturing it, it'll give off a sort of an rakish feel to it- perfect for the sort of man he portrays.

Lastly, I've been trying to brainstorm a topic for in-depth research. Last year I looked into the myth of detachable sleeves in doublets in 16th century Western Europe and the uniforms of the trained bands (militia) of the city of Bristol at the time of the Queen's visit in 1574. I'm at a loss. I have a small project going about the truth behind "lace-up" men's body garments from the same time period, but I want something epic. If you have any ideas or suggestions for topics, let me know!

Anyways, I'm off for now. What sort of projects do you have lined up? If you need sources for anything, I'm sitting on a mountain of them, so post up here if you need some help finding information to get you going.

Best,

-Dan

Monday, December 13, 2010

Mary Rose Knife Recreation

For sale is a walnut handled version of knife #81A0847 on page 147 from Before the Mast.


Another nice simple utilitarian knife with a lobed handle. The rivets are copper, and the handle is finished with danish oil.


Leather sheath will be dyed to buyer's preference. Total including shipping $65.

Monday, November 29, 2010

Flair Hanger with Hardware

The hardware for the cut out hanger is all set. Heather's suggestion of an angular pad hook works really well, and I love the contrast of the bright hardware versus the dark brown/red of the leather.


I decided to use the new buckles I cast from the 16th century original as the buckles for this one and I really like them I'm going to use them as the basis for a complete set of hanger hardware for the future.


It needs a little bit of clean up and then its ready to go. If anyone is interested in picking this one up let me know!

Sunday, November 28, 2010

Some new castings

I've been doing some pewter casting lately to add accessories to my 16th Century equipment. Little things like buckles and buttons, as well as attempts at medals and pins. I say attempts because those haven't worked so far. The buttons and buckles however, have.

My wife and I worked on doing some roughs of different buttons from finds ranging in dates from 1300's to the early 1600's. After doing the molds and getting everything set here is the first picture of the small button suite, not cleaned up yet.


From left to right we have:

1. Ridged Cone - 16th C
2. Pyramid - 16th C
3. Ball - 14th-17th C
4. Lantern - No providence
5. Acorn - 16th C
6. Shallow Dome - 14th-17th C
7. Cross - 15th C

I also very pleased to have purchased an original 16th century buckle from Talbot's Fine Accessories. I made a mold of it and the first result is great. I plan on using this on belts and hangers.


So some other fun stuff I've been working on. I've got some larger buttons ready to be cast in the next day or so as well.

Thursday, November 25, 2010

16th Century German Knife - Finished, with Sheath


Finished up the clean up on the German knife and added a sheath. Sheath is made from a double layer of 2-3 oz oak tanned leather, stitched with waxed linen thread. I dyed it using Tandy Leather's Mahogony oil based dye and buffed out with some beeswax. As much as I hate to I'm going to be putting this one up for sale shortly on a couple of forums. Cost is going to be $65 shipping included to the US.


Monday, November 22, 2010

Elizabethan Woman's Girdle

Woman's clothing confounds me. It is this mystical set of garments that shapes and moves bits around and has whale bone in it, expensive stuff has pearls sewn into it, and all other sorts of chaos. When you look at artwork you see high status women wearing not a traditional belt, but a jewel encrusted delicate work of art that follows the lines of their clothing and drops down the front showing off wealth, station, and possibly even holding a small book or knife.


My wife Heather and friend Shelly like making jewelry and paternosters (medieval and renaissance prayer beads), and decided to try their hand at making what the 'in crowd' of the renaissance called girdles.


Their first attempt is a bronze colored waist chain that comes to a foliate style hub.


From the hub comes a length of green pearls (yes real ones), polished stones, and quartz.


It is really pretty. They are trying to do more for an event coming up in a couple of weeks, and if this is any indication of how they will turn out, they will be very impressive.

Sunday, November 21, 2010

16th Century German Knife - It's a Mystery

When looking for knife images, I stumbled across a mid 16th century German knife that I really liked. It had a clip point and a nice long profile. I promptly have lost the picture of the original, but I did my best to remember the shape. I have no idea where the image is and I have yet to be able to find it in any of my files and in my search-fu of the intarnets. Mystery part one.

This past spring I attended the Prairie du Chein rendezvous and bought a set of red wood scales. I'm pretty sure the purveyor of the store said they were bloodwood, but the label that was on the wood had vanished into thin air so I can't be sure. Mystery part two.


No matter what it actually is, I like it. The wood has an amazing color to it. Deep and bright, the red stands out, especially after the light coat of Danish oil on it. I chose copper rivets to pop through the wood color and their bright nature really stands out. The fact that the blade has a clip point to it makes it different from anything else I have made so far. I really like how this one has turned out. The pictures don't do the wood justice, I find it simply stunning.


All the pieces of the puzzle ended up making this one heck of a knife. I'll be doing a sheath for it as well, just got to figure out what color to dye the leather now. Maybe I'll just mix a bunch of colors together and see what happens.

Thursday, November 18, 2010

Ale through the Ages - Gratzer Ale Bottling Day

Last night was bottling night for the Gratzer Ale that was made at the Discovery World Museum's Ale through the Ages program. We headed up to the biology lab on the second floor to see the volunteers hard at work sanitizing equipment. The class participants were invited to bring Polish beers to sample, and we were able to try the same Berliner Weiss from the first class. Another 2 weeks in the keg did amazing things to it. This one was brewed outdoors during one of the Lakefront's many festivals and was inoculated with a wild strain of yeast if I'm not mistaken. The two weeks it spent in the keg between classes changed the beer significantly. It went from a slight thin and sour taste, with citrus notes to a full on sour. It had the horsey sourness of the wild yeast coupled with the citrus notes making it a totally different animal. The acid level tasted high to me, and I started craving some bread and oils to mellow out the flavors in my mouth.

We took a look at the two carboys that were used to ferment the beer and noticed some substantial differences. One carboy was done with a White Labs Kolsch yeast that Keven mentioned too a bit longer to get going. This one did not have any clarifying/fining agents added to it and had a soft amber color that had the distinct haze of a wheat beer. The second carboy was done with a Wyeast German Wheat strain and had Isinglass added as a fining agent. Isinglass is an agent taken from the air bladder of a sturgeon and was used as a clarifying agent historically. This carboy had a darker color to it, and you could see coagulated material in a low suspension. Once we had taken note of the different yeast strains we were instructed on how the bottling would proceed and we began in earnest.

The bottling session is a group affair. One person per carboy manned the bottling wand, filling bottles off the carboy for us. The bottles moved then to a capping table where members of the class vigorously capped the bottles using hand cappers. They then moved down to a labeling table where folks took labels that Kevin had designed and adhered them to the bottle. The process for adhering was interesting as we used a simple 20ld weight paper with laser printing, and milk. The back of the label was dipped into milk and then pressed firmly onto the bottle creating a bond. Excess milk was wiped off and the label was on nice and tight. Kevin said that he had learned the process from a professor of his who was a homebrewer herself. He has had bottles last years with the milk label, but it is susceptible to water, so no ice in the cooler with these. I was on a labeling station and had good conversation with folks around the table while working. It was also nice to sample a few of the smoked ales that people brought to share.

Overall the atmosphere was very relaxed, friendly and an all around good time. When done we were allotted one bottle of each type and if you wanted to stick around and converse a bit there would be left overs. I stuck around for a bit talking to some folks that do history oriented tasks and a few more seasoned brewers about how they do things (and getting tips on my cherry wheat I have going right now) and was able to leave with an extra bottle or two for some good friends that weren't able to make it to this session.

I had a blast and am hoping I'll be able to do more of these. There is a Colonial Porter class in December that sounded great, and Kevin announced three more classes after the first of the year begining with a Medieval Gruit, a traditional Milwaukee wheat, and a Scotch/Irish Heather Ale. I'm hoping some of my brewing compatriots will be able to join me, but even if they don't I know I'm going to try and make it down!

Kevin has put up information from this last session on his site which chronicles the archeology wing of the Discovery World Museum.

http://distantmirror.wordpress.com/

Tuesday, November 16, 2010

Buttons Rule

I love the look of thread covered buttons, and they are totally period for the 16th century. I hate, I mean HATE, making thread covered buttons. I also don't want to spend an arm and a leg in shipping costs to get really good period buttons from the UK because, well this is a hobby and my money needs to go to real life costs. So I set a goal to make some buttons that I and the folks I do my hobbies with could use. I looked through artwork and used some creative license to make up a few trial buttons.


What we've got from top around clockwise is a simple round, a flower bud (first ever work by my wife Heather, which I think is pretty awesome), pyramid, lobed cone, and a faceted one, that kind of looks like a lamp post. I need to get some more molding materials on order but when I do I'm going to give these a go.

More Sword Hanger Flair

I did some clean up on the cut outs and cut the strapping for the buckles over the weekend. For the color I wanted something that would make the buckles and other hardware pop, so I went with Fiebings Mahagony. It came out darker than normal so I may need to check my dye, but it still has red tones despite how dark it is.


My wife made the suggestion to switch up the pad hook a bit, seeing as all the pierce work is angular. My current pad hooks are lobed, either single or double, so I took one of the double lobes and made it more angular. What you see in the pictures is the rough finish of both the hanger and pad hook.


I've started to recondition the leather as the dye tends to dry it out. The pad hook is in the middle stages of shaping, with the roughing out done and the polishing and clean up not started yet.


More to come!

Thursday, November 11, 2010

Sword hanger with flair!

This past summer I made a hanger that had my first attempt at pierce work on the leather. It turned out pretty well and I backed it with a rich gold cotton velvet to make it stand out. I ended up cutting out 4 more hanger parts this weekend and picked one to try an experiment on.

I wanted to do some more pierce work and also try doing some tooling work. I've never done tooling before but I saw how a friend of mine did it, so I figured what the heck. This is my second attempt at pierce work and my first at some basic geometric tooling on a hanger. So far I like how it looks. It isn't perfect by any means but its a good start, and with practice I think I'll get closer to what I have in my mind's eye and really enjoy what I'm producing.

Because these posts are useless with out pictures...


A wide shot:


A bit of a close up on the work area:


What's that on the left side? Oh it may just be some buttons Heather and I are working on to cast.


More pictures will be forth coming. Its set to be a 5 buckle hanger, I just need to figure out what color to choose.

Tuesday, November 9, 2010

Interpretation of a late 16th C/early 17th C Baldric

How do you hold a sword up without tripping on it or hitting people as you walk? By wearing the correct suspension for your sword of course! This is a project from the summer that I've done some recent tweaking on. Sword belts and hangers are by far the most common thing seen in material finds and artwork for the mid to late 16th Century in Europe. Every now and then (I can think of three out of all the images I've ever looked at) you see an over the shoulder suspension represented prior to 1620. One of the folks I do Bristol with, really prefers something that is able to do both over the shoulder and at the waist for carrying his sword. He wanted something to wear that would work with both his soft kit and when wearing his armour without a whole bunch of unhooking and resetting sizes etc. I racked my brain for a while and took my inspiration from two particular images. The first, a picture of a Lieutenant in Tomas Lant's depiction of the Funerary Procession for Sir Phillip Sidney, seen here:


and the image of a hunter/keeper of hounds:


To this end I put together something that can be adjusted to be worn as a baldric, but also tightened up to be worn at the waist. The sword position when worn at the waist puts the sword at a similar position to what is seen with integral belt suspensions on medieval longswords and single hand swords.

Here's some pictures of it in the baldric configuration modeled by the ever photogenic Ed.


And a close up of the suspension itself.


From all accounts and purposes it works well while marching and on the move, so I consider it a success! I will try to get a photo or two of it in the waist belt position shortly.